m3 side mirrors install
 07-06-2005, 06:10 PM
#1
Senior Moderator
Thread Starter
Join Date: Jul 2002
Location: Bay Area, CA
Age: 38
Posts: 12,005
Likes: 0
Received 9 Likes
on
8 Posts
m3 side mirrors install
Disclaimer: by using these guides, you are removing me from any liability that is related to any injury that might occur. I would suggest having a friend help you on these installs, if you are unsure about your abilities for any of these projects, get a professional to do it.
Credit goes to froggystyle14 (doinfroggy@yahoo.com) for the original write up and pics
Tools:
Drill
�� drill bit
Flat head and Phillips head screwdriver
Wire cutter/strippers
Electrical tape or wire connectors
6 screws-ones that will fit in bracet holes
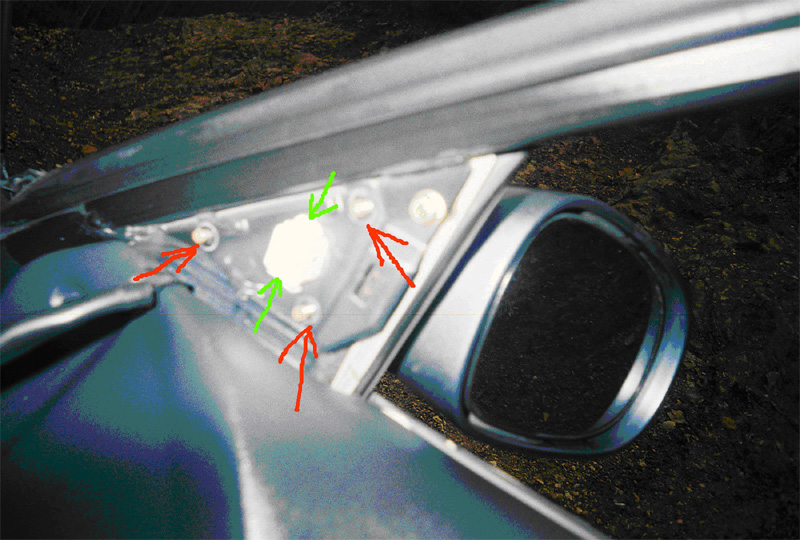
1. locate the piece on the door that covers the mirror bolts and wires. Gently pry off. There is only I clip holding it on
2. Once panel is removed, you will need to disconnect the wire harness plug by depressing the locking pin and pulling.
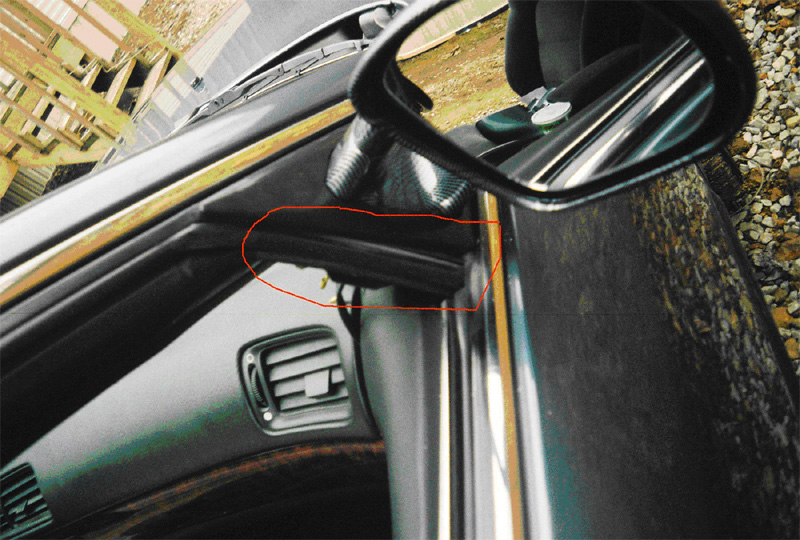
3. You will now need to remove 3 � 8mm nuts (red arrows). Once removed you will notice that the mirror will not come out and that is because the plug for the mirror is locked in place. By taking a small screw driver, gently push the top clip down and then the one on the bottom clip and the mirror will fall out. (green arrows)
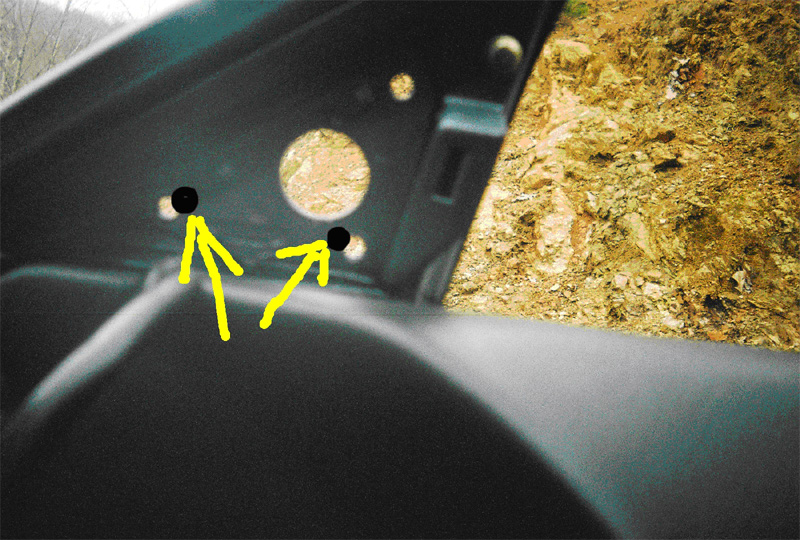
4. Now go to the box that your new mirrors are in and find the bracket that mounts to the car. Once found, you will need to position the bracket on the out side to where the top of the bracket barely sits on the rubber seal. What you will notice is that the holes don�t line up but the top one. Get a sharpie, and while holding the bracket where you want it, mark the holes where the bracket holes line up. And it should look similar to the following pic:
5. Now you will need the drill and a �� drill bit.. Go ahead and drill your marks out and it will be ok if the holes become one (might help you on the adjustment of bracket)
6. The screw that come with mirrors are to mount the mirror to the bracket. Once mounted to bracket, feed all wires through the hole and use the screws that you bought to mount the mirror to the car.
7. Once mounted, make sure that the margins on the outside look similar to the following pics.
7a. First pic, the red arrows and dotted line represents the placement of the mirror on top. There should be no gaps on topso no water can get down there.
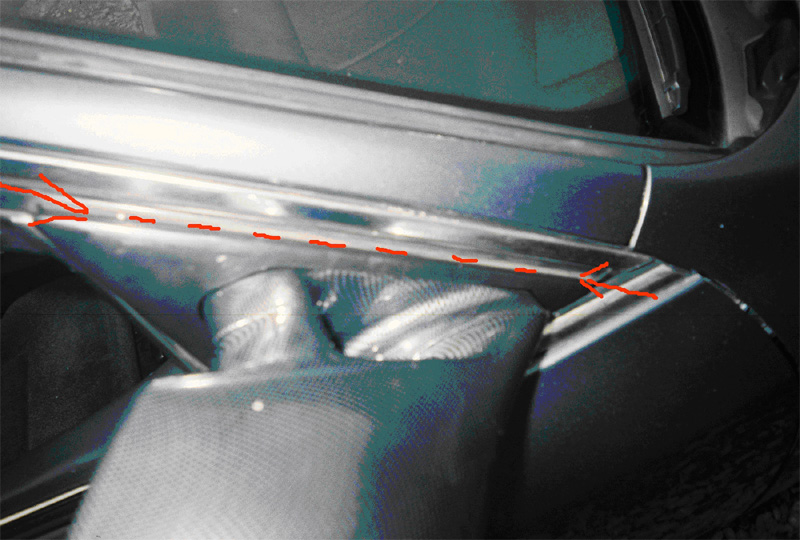
7b. Next pic shows that there will be a slight gap on the inside but nothing to worry about
8. Now its time for the wiring. This was probably the most time consuming part of the installation for me and I still couldn�t get the mirrors to move correctly�.one problem is that one of my mirrors is wired incorrectly inside so I am not worried about it too much..
9. There are 6 possible orders for the wires to go in and I attempted it on both sides. On the drivers side the wire colors are blue/orange---blue/green---blue/white and the wires out of the m3 mirror red black and white. The best order I could get them in is blue/orange to red, blue/green to white, and blue/white to black. Which the controls went up is up, down is down, left is right and right is left.. what I suggest you do is get a piece of paper out and write down the 3 colors of wires like this and find out what best works for you mirror:
STOCK NEW
B/ORANGE ---- R R W W B B
B/GREEN--- W B B R W R
B/WHITE--- B W R B R W
R=RED W=WHITE B=BLACK.
3) FOR THE LEDS�, CONNECT THE BLUE WIRE TO YOU PARKING LIGHTS, THE WHITE WIRE TO YOUR TURN SIGNALS, AND THE BLACK TO A GROUND.
ANY QUESTIONS FEEL FREE TO EMAIL DOINFROGGY@YAHOO.COM
Credit goes to froggystyle14 (doinfroggy@yahoo.com) for the original write up and pics
Tools:
Drill
�� drill bit
Flat head and Phillips head screwdriver
Wire cutter/strippers
Electrical tape or wire connectors
6 screws-ones that will fit in bracet holes
1. locate the piece on the door that covers the mirror bolts and wires. Gently pry off. There is only I clip holding it on
2. Once panel is removed, you will need to disconnect the wire harness plug by depressing the locking pin and pulling.
3. You will now need to remove 3 � 8mm nuts (red arrows). Once removed you will notice that the mirror will not come out and that is because the plug for the mirror is locked in place. By taking a small screw driver, gently push the top clip down and then the one on the bottom clip and the mirror will fall out. (green arrows)
4. Now go to the box that your new mirrors are in and find the bracket that mounts to the car. Once found, you will need to position the bracket on the out side to where the top of the bracket barely sits on the rubber seal. What you will notice is that the holes don�t line up but the top one. Get a sharpie, and while holding the bracket where you want it, mark the holes where the bracket holes line up. And it should look similar to the following pic:
5. Now you will need the drill and a �� drill bit.. Go ahead and drill your marks out and it will be ok if the holes become one (might help you on the adjustment of bracket)
6. The screw that come with mirrors are to mount the mirror to the bracket. Once mounted to bracket, feed all wires through the hole and use the screws that you bought to mount the mirror to the car.
7. Once mounted, make sure that the margins on the outside look similar to the following pics.
7a. First pic, the red arrows and dotted line represents the placement of the mirror on top. There should be no gaps on topso no water can get down there.
7b. Next pic shows that there will be a slight gap on the inside but nothing to worry about
8. Now its time for the wiring. This was probably the most time consuming part of the installation for me and I still couldn�t get the mirrors to move correctly�.one problem is that one of my mirrors is wired incorrectly inside so I am not worried about it too much..
9. There are 6 possible orders for the wires to go in and I attempted it on both sides. On the drivers side the wire colors are blue/orange---blue/green---blue/white and the wires out of the m3 mirror red black and white. The best order I could get them in is blue/orange to red, blue/green to white, and blue/white to black. Which the controls went up is up, down is down, left is right and right is left.. what I suggest you do is get a piece of paper out and write down the 3 colors of wires like this and find out what best works for you mirror:
STOCK NEW
B/ORANGE ---- R R W W B B
B/GREEN--- W B B R W R
B/WHITE--- B W R B R W
R=RED W=WHITE B=BLACK.
3) FOR THE LEDS�, CONNECT THE BLUE WIRE TO YOU PARKING LIGHTS, THE WHITE WIRE TO YOUR TURN SIGNALS, AND THE BLACK TO A GROUND.
ANY QUESTIONS FEEL FREE TO EMAIL DOINFROGGY@YAHOO.COM
 02-23-2009, 07:20 PM
#2
Instructor
Join Date: Dec 2008
Location: VA beach VA.
Age: 44
Posts: 181
Likes: 0
Received 0 Likes
on
0 Posts
I used this and i have to say this helped me out a ton but as far as runnin the wires to the mirrors just do trial and error dont waste your time writing stuff down as there is only 9 possible ways to hook them up and only 1 right way.(3 wires on the car + 3 wires on the mirrors= 9 per door)
and the wires coming from the car to the mirrors are different colors on the drivers side and the passenger side dorrs
and the wires coming from the car to the mirrors are different colors on the drivers side and the passenger side dorrs
02-23-2009, 10:36 PM
#3
Senior Moderator
Regional Coordinator
(Mid-Atlantic)
Regional Coordinator
(Mid-Atlantic)
iTrader: (6)
Where did you splice off the turn signals?
02-24-2009, 03:50 PM
#4
Instructor
Join Date: Dec 2008
Location: VA beach VA.
Age: 44
Posts: 181
Likes: 0
Received 0 Likes
on
0 Posts
in the corner bumper turn signal light deals, i just unplugged the light bulb and stuffed in the + and the - into it and plugged it back in so i didnt need to cut anything.
i bought a a spool of intercom wire from radio shack it came with a black one and a white so i didnt get mixed up and have to follow it back to figure what was what
2 wires in one deal like speaker wire
i bought a a spool of intercom wire from radio shack it came with a black one and a white so i didnt get mixed up and have to follow it back to figure what was what
2 wires in one deal like speaker wire
04-27-2011, 10:12 AM
#6
7th Gear

Join Date: Jan 2011
Age: 31
Posts: 7
Likes: 0
Received 0 Likes
on
0 Posts
i was wondering what year these side mirrors are? ive looked around and found the 1995 m3 mirrors look similiar, and ive also found the mimousa side mirrors look a bit different, but similiar. Just making sure, thanks in advance.
04-27-2011, 11:55 AM
#7
Senior Moderator
Regional Coordinator
(Mid-Atlantic)
Regional Coordinator
(Mid-Atlantic)
iTrader: (6)
They're m3 style mirrors, for the 94-97 accord
Trending Topics

Thread
Thread Starter
Forum
Replies
Last Post
rockyboy
2G RDX (2013-2018)
170
12-06-2022 02:29 PM
sockr1
Car Parts for Sale
22
10-01-2015 01:31 AM